Tuesday, May 19, 2009

WINDOWS LIVE MAIL FOR Web-based (HTTP) e-mail account


You cannot configure Windows Mail to use a Web-based (HTTP) e-mail account on a computer that is running Windows Vista. Give this link to the customer to justify this.
http://support.microsoft.com/kb/926374

Instead download WINDOWS LIVE MAIL (make sure to check the system requirements before suggesting this download).http://download.live.com/wlmail

Setting up AOL in WINDOWS LIVE MAILhttp://www.freeemailtutorials.com/windowsLiveMail/setupEmailAccounts/index.htm

Setting up YAHOO in WINDOWS LIVE MAILhttp://www.freeemailtutorials.com/windowsLiveMail/setupEmailAccounts/setupYahooMailAccount.htm

Setting Up Hotmail in WINDOWS LIVE MAILhttp://www.freeemailtutorials.com/windowsLiveMail/setupEmailAccounts/setupHotmailAccount.htm

Setting Up GMAIL in WINDOWS LIVE MAILhttp://www.freeemailtutorials.com/windowsLiveMail/setupEmailAccounts/setupGmailAccount.htm


IE8 is not listed on windows updates


If IE8 is not listed on windows updates, use this method:

1. Carefully select and then copy the following command:

%windir%\ie8\spuninst\spuninst.exe

2. Click Start, click Run, type cmd.exe, and then press ENTER.

3. Right-click inside the cmd.exe window, and then click Paste to paste the command that you copied in step 1.

4. Press ENTER to uninstall Internet Explorer 8 Beta 2. When the uninstall program is finished, restart your computer.

Verify that your earlier version of Internet Explorer was restored.

How to disable the Autorun functionality in Windows


http://support.microsoft.com/kb/967715/

Error message: The installer has encountered an unexpected error: code is 2203


The installer has encountered an unexpected error installing this package. This may indicate a problem with this package. The eorror code is 2203

There are a couple of cases where I have seen this error in the past for the .NET Framework, windows live messenger and other types of MSI-based setup packages. There are two reasons for this.
Cause 1:
Permission problems for the %windir%\installer folder - If the Windows Installer service does not have sufficient permissions to read and write to this folder, the installation will fail.
Resolution:

Typically the subinacl tool described here will fix the permissions and then you can re-run setup and it will work correctly.

Here are the steps to follow to repair permissions to workaround this issue:
Download the SubInACL tool from this Microsoft site (http://www.microsoft.com/downloads/details.aspx?FamilyId=E8BA3E56-D8FE-4A91-93CF-ED6985E3927B&displaylang=en) and install it. By default it will install to c:\Program Files\Windows Resource Kits\Tools
Go to the Start menu, choose Run and type cmd
Type cd /d %ProgramFiles%\Windows Resource Kits\Tools to change directories to the folder that SubInACL is installed to
Type notepad reset.cmd and press yes to create a new file named reset.cmd in c:\Program Files\Windows Resource Kits\Tools
Copy and paste the following contents into reset.cmd and then save and close it (or download it from here and rename it from reset.cmd.txt to reset.cmd):subinacl /subkeyreg HKEY_LOCAL_MACHINE /grant=administrators=f subinacl /subkeyreg HKEY_CURRENT_USER /grant=administrators=f subinacl /subkeyreg HKEY_CLASSES_ROOT /grant=administrators=f subinacl /subdirectories %SystemDrive% /grant=administrators=f subinacl /subkeyreg HKEY_LOCAL_MACHINE /grant=system=f subinacl /subkeyreg HKEY_CURRENT_USER /grant=system=f subinacl /subkeyreg HKEY_CLASSES_ROOT /grant=system=f subinacl /subdirectories %SystemDrive% /grant=system=f
Type reset.cmd and press enter to run the SubInACL tool (you will need to have adminstrator privileges for this to run correctly). This tool will take several minutes to run
After reset.cmd completes, try to install the .NET Framework 2.0 or VS 2005 again


Cause 2:
Anti-virus software - If you have a real-time virus scanner enabled, and it happens to be scanning the file in %windir%\installer at the same time as setup is trying to open the file and install from it, you will get this type of error.

Resolution:

This is generally a timing issue, and in this case re-running setup will fix it. Alternatively, you can disable real-time virus scanning during installation, but if you do this please be aware of the security implications of doing so and either install while not connected to the network, or if that is not possible, make sure to immediately re-enable the virus scanner after setup completes.

Error:"No supported disc burners found" When trying to burn Discs in iTunes in Windows Vista.

Itunes is a 'GEAR Powered Product' so we need to re-install the Gear drivers, to resolve issues with Burning in Itunes.

If you have lost or do not have recording capabilities within your GEAR Powered Product after upgrading or installing, please download and install the latest GEAR drivers (below) for your system.

GEAR licenses our CD/DVD recording 'drivers' to many companies to add CD/DVD recording capabilities to their software products. This driver interface provides the connection between their software application and the user's operating system and hardware.


Any product that includes the GEARApsi.dll or GEARAspiWDM.sys recording 'drivers' is considered to be a 'GEAR Powered Product'

If you have lost or do not have recording capabilities within your GEAR Powered Product after upgrading or installing, please download and install the latest GEAR drivers (below) for your system.

1) close iTunes
2) go to http://www.gearsoftware.com/
3) click on "Support"
4) click on "Drivers"
5) download x86 or x64 drivers as appropriate
6) run driver install
7) start iTunes and burn away

We need to uninstall Itunes before performing the above steps.

1. Uninstall Itunes from Programs and Features.
2. Install the Gear Driver

http://www.gearsoftware.com/downloads.php?dir=updates/windows/drivers/&file=Driver_Installer_x86_x64.exe

The above-mentioned URL will take you to a non-HP Web site. HP does not control and is not responsible for information outside of the HP Web site.

3. Install Windows Installer Cleanup Utility for Vista and remove all the Itunes and Apple entries.
4. Restart the PC and install ITunes again.

Ref: http://forums.ilounge.com/archive/index.php/t-12005.html

GEAR Powered Product – What is that?
Any product that includes the GEARApsi.dll or GEARAspiWDM.sys recording 'drivers' is considered to be a 'GEAR Powered Product'
Examples of 'GEAR Powered Products'
· Apple's iTunes for Windows
· Symantec Backup Products, i.e. Norton Save & Restore etc.

HP Toolbar (Microsoft Live Search Tool Bar)


“Microsoft Live Search Toolbar to Be Distributed on 2009 HP Consumer PCs”The article also says that: The toolbar will provide HP with customization capabilities within the buttons on the toolbar, providing quick and easy access to a variety of online services and tools, such as Snapfish by HP, the company’s online photo service, and HP customer support.As the toolbar contains Snapfish by HP, HP customer support and other links only related to HP. The customers think it’s an HP toolbar.Go through the below web link for more information.
http://www.microsoft.com/presspass/press/2008/jun08/06-02HPToolbarPR.mspx
However, to remove the toolbar completely, simply uninstall Microsoft Live Search Toolbar from programs and features.

IR Sensor (Receiver) Not Detected in Media Center


Go back in to Windows Media Center setup Select: Tasks -> Settings -> TV -> Setup TV Signal Answer YES to popup questions - are you sure?? Continue normally through TV Signal Setup UNTIL: Select -> I WILL MANUALLY CONFIGURE MY TV SIGNAL Select -> ANTENNA - I dont care what you are plugged in to Select -> ANALOG-ONLY ANTENNA - I dont care what you are plugged in to Select -> RETURN TO TV SETTINGS - unless you really want Guide Listings Select -> FINISH You hae now by-passed the IR control device.
you hve to use a cable input and not a S-Video or composite input.
But IT WORKS !!!

Unable to Download Files Using Internet Explorer - How to Fix It


Sometimes the index.dat file can become damaged. If this occurs, you'll have to delete the index.dat file and restart your computer. Then you'll be able to download files correctly again.

Follow the steps below to delete this file.
1) Open Internet Explorer.
2) Click on Tools, Click on Internet Options
3) On the General tab under Temporary Internet Files, click on Delete Files
4) Click Ok when it asks if you want to delete the files
5) Under the History section on the General tab, click Clear History, then click Ok
6) Close Internet Explorer
7) Log off the current user and Log onto another user account such as Administrator
8) Click on Start, Run
9) Type CMD and Press Enter to open a command prompt
10) Change directories to the Temporary Internet Files directory by typing the following command, substituting the correct drive letter and the word username with the correct user in Windows XP.

cd drive:\Documents and Settings\username\Local Settings\Temporary Internet Files\Content.IE5

Example: cd c:\Documents and Settings\Mark\Local Settings\Temporary Internet Files\Content.IE5

11) type del index.dat and press Enter
12) Type Exit and press Enter to close the command prompt
13) Restart your computer

Once the computer has been restarted, open a web page with a link to a download. Click on the link and try to download the file. It should now work.

How to Fix Computer Continuously Rebooting After XP SP3 is installed

Stop Error 0x0000007E After SP3 is installed
This problem only appears on some systems after upgrading to SP3. This particular problem on systems that have been prepared with SysPrep. The sysprep image was created on an Intel based computer, and then the sysprep image is deployed on a Non-Intel system such as an AMD processor. In these cases, the registry entry for Intelppm is incorrectly set and causes the computer to go into a continuous reboot after the service pack has installed.

How Can I Solve This Problem?
Follow these steps to resolve this issue with the computer not booting correctly after SP3 is installed.
1) Start your computer in Safe Mode.
2) Click on Start, Run, and type REGEDIT and press Enter. This will open the Registry Editor.
3) Click the pluses(+) next to the following registry keys to navigate to the correct spot.
HKEY_LOCAL_MACHINE
SYSTEM
CurrentControlSet
Services
Intelppm
4) In the right hand column find the entry titled START and double-click on it
5) Change the number to 4 and click Ok
6) Close the Registry Editor
7) Shut down your computer and restartThis time the computer should restart normally and finish the installation of SP3.

How to Remove MSBLAST.exe worm virus


What is the MSBLAST.EXE worm aka Blaster.A, LoveSan or Msblast.A?

The MSBLAST.A worm infects machines via network connections. It can attack entire networks of computers or one single computer connected to the Internet. The worm exploits a known windows vulnerability that is easily patched, however few systems seem to have this patch installed. It attacks Windows 2000 and Windows XP machines and exploits the DCOM RPC Vulnerablity. Depending on the system date it will start a Denial of Service attack against windowsupdate.com, this makes it difficult to download the needed patches and allow the worm to infect as many machines as it can before being disabled. However, as of August 15th, Microsoft decided to kill the windowsupdate.com domain to lessen the impact from this denial of service attack. MSBLAST can also cause widespread system instability including but not limited to Windows Blue screens, out of memory errors, changes to Control Panel, inability to use functions in browser, and many more oddities.

Download the Windows patches for this vulnerability by clicking on the links below:
Windows XP: DCOM/RPC Exploit patch
Windows 2000: DCOM/RPC Exploit patch

These Windows vulnerabilities are patched by using Windows Update to download all the critical updates for your system. However in some cases, people have reported getting an error 0x800A138F when trying to download updates.

What is the DCOM Vulnerability?
The DCOM vulnerability in Windows 2000 and XP can allow an attacker to remotely compromise a computer running Microsoft® Windows® and gain complete control over it. The worm causes a buffer overrun in the Remote Procedure Call (RPC) service. When this service is terminated the virus infects the machine and then tries to infect other machines.

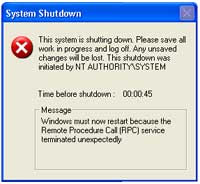
What are the Symptoms of the MSBLAST worm?
You'll see a screen similar to the one below when you are infected, this will countdown to zero and literally shut down the system completely. The warning will state "This shutdown was initiated by NT AUTHORITY\SYSTEM". The message will read
Windows must now restart because the Remote Procedure Call (RPC) service terminated unexpectedly.
You can disable this shutdown by following the steps below during the countdown
Click on Start, Run
Type in CMD and press ENTER
Type in the following command and press EnterSHUTDOWN -A
This will terminate the shutdown, however in most cases the system may be to unstable to try to recover and may need to be rebooted anyway.
How Does MSBLAST Infect My Computer?
The worm creates a Mutex named "BILLY." If the mutex exists, the worm will exit.
Adds the value:”windows auto update" = MSBLAST.EXE (variant A)”windows auto update" = PENIS32.EXE (variant B)”Microsoft Inet xp.." = TEEKIDS.EXE (variant C)"Nonton Antivirus=mspatch.exe" (variant E)"Windows Automation" = "mslaugh.exe" (variant F)"www.hidro.4t.com"="enbiei.exe" (variant G) to the registry key:HKEY_LOCAL_MACHINE\SOFTWARE\Microsoft\Windows\CurrentVersion\Runso that the worm runs when you start Windows.
Calculates the IP address, based on the following algorithm, 40% of the time:Host IP: A.B.C.Dsets D equal to 0.if C > 20, will subtract a random value less than 20.Once calculated, the worm will start attempting to exploit the computer based on A.B.C.0, and then count up.This means the Local Area Network will be infected almost immediately and become become saturated with port 135 requests prior to exiting the local subnet.
Calculates the IP address, based on many random numbers, 60% of the time:A.B.C.Dset D equal to 0.sets A, B, and C to random values between 0 and 255.
Sends data on TCP port 135 that may exploit the DCOM RPC vulnerability to allow the following actions to occur on the vulnerable computer:Create a hidden Cmd.exe remote shell that will listen on TCP port 4444.NOTE: Due to the random nature of how the worm constructs the exploit data, it may cause computers to crash if it sends incorrect data. This can cause blue screens, out of memory errors, etc.
Listens on UDP port 69. When the worm receives a request, it will return the Msblast.exe binary.
Sends the commands to the remote computer to reconnect to the infected host and to download and run Msblast.exe.
If the current month is after August, or if the current date is after the 15th, the worm will perform a DoS on "windowsupdate.com."With the current logic, the worm will activate the DoS attack on the 16th of this month, and continue until the end of the year.
The worm contains the following text, which is never displayed:
I just want to say LOVE YOU SAN!!billy gates why do you make this possible ? Stop making money and fix your software!!
Windows 2000 Machines
On Windows 2000 machines, I have seen the Control Panel icons switch to the left pane, functions like FIND in the browser stop working, and many other oddities.

How Can I Remove the MSBLAST worm?
Follow these steps in removing the MSBLAST or MSBLASTER worm.
1) Disconnect your computer from the local area network or Internet
2) Terminate the running program
Open the Windows Task Manager by either pressing CTRL+ALT+DEL, selecting the Processes tab or selecting Task Manager and then the process tab on WinNT/2000/XP machines.
Locate one of the following programs (depending on variation), click on it and End Task or End Process
MSBLAST.EXEPENIS32.EXETEEKIDS.EXEMSPATCH.EXEMSLAUGH.EXEENBIEI.EXE
Close Task Manager
3) Install the patches for the DCOM RPC Exploit, you can download the patches from the links below before disconnecting
Windows XP Pro/Home Edition
Windows 2000Windows NT Server 4.0 and Windows NT Workstation 4.0
Windows NT Server 4.0, Terminal Server Edition
Windows XP (64 bit) (server edition)
Windows 2003 (32 bit)
Windows 2003 (64 bit)
If you receive a "cryptographic service" error when you try to apply the patch, please read the following excellent article on how to fix this error:
http://www.updatexp.com/cryptographic-service.html
4) Block access to TCP port 4444 at the firewall level, and then block the following ports, if they do not use the applications listed:
TCP Port 135, "DCOM RPC"
UDP Port 69, "TFTP"
5) Remove the Registry entries
Click on Start, Run, Regedit
In the left panel go to
HKEY_LOCAL_MACHINE>Software>Microsoft>Windows>Current Version>Run
In the right panel, right-click and delete the following entry
”windows auto update" = MSBLAST.EXE (variant A)”windows auto update" = PENIS32.EXE (variant B)”Microsoft Inet xp.." = TEEKIDS.EXE (variant C)"Nonton Antivirus"=MSPATCH.EXE (variant E)"Windows Automation" = "mslaugh.exe" (variant F)"www.hidro.4t.com"="enbiei.exe" (variant G)
Close the Registry Editor
6) Delete the infected files (for Windows ME and XP remember to turn off System Restore before searching for and deleting these files to remove infected backed up files as well)
Click Start, point to Find or Search, and then click Files or Folders.
Make sure that "Look in" is set to (C:\WINDOWS).
In the "Named" or "Search for..." box, type, or copy and paste, the file names:msblast*.* (or other filenames listed above)
Click Find Now or Search Now.
Delete the displayed files.
Empty the Recycle bin, the worm can reinfect even if the files are in the recycle bin.
7) Reboot the computer, reconnect the network, and update your antivirus software, and run a thorough virus scan using your favorite antivirus program.
8) Now check for the worm again, if it returns, complete these steps once more until the virus is gone. With the patch in place, the virus wont be able to exploit the system, but sometimes it is difficult to remove the files for good.
For Automatic Removal of MSBLAST, download the Symantec removal tool, you'll still need to download the patches above and install them, however this removal tool will stop the MSBLAST program from running, remove the items in the registry, and delete the infected files.
You can find more information about this worm by visiting Symantec's or TrendMicro's pages on this worm
Microsoft's Page on What You Should Know About the Blaster worm

How to Remove the Content Advisor Passwordin Internet Explorer or Fix Missing Information

How to Remove Content Advisor Password in Internet Explorer

The following steps will remove any password set in the Internet Explorer Content Advisor and allow you to reset the program to its original state.
1) Click on Start and choose Run.2) Type in RegEdit
and select OK.3) Now click on the little plus sign to the left of H_KEY_LOCAL_MACHINE.4) Continue to drill down, always clicking on the plus sign at the left of the named key, through Software, Microsoft, Windows, Current Version and Policies.5) Now click on the Ratings folder.
window.google_render_ad();
6) In the right pane of the RegEdit window, you'll see an icon called Key. Click on it and press Delete.7) Next, choose Registry and then Exit to exit RegEdit. You've just deleted your original Content Advisor password.8) Restart the computer and run Internet Explorer again.9) Choose View and then Internet Options (or Options for version 3.x). For IE 5 or greater, Click on Tools, Internet Options.10) Click on the Content tab and click on Disable. When asked for a password, don't enter anything; just click on OK. This will disable Content Advisor because there's no longer a password.

How to Fix Problems with Content Advisor Missing Information
In most cases, this problem occurs when the Ratings.pol file is damaged, follow the instructions below to fix this issue.
1) Quit Internet Explorer
2) Open My Computer, click on Tools, Folder Options
3) Click on the View tab and make sure "Show hidden files and folders" is selected, you may also want to uncheck the box next to "Hide extensions for known file types" and click Ok
4) Double click on Drive C in My Computer
5) Double click on the Windows folder and then double click on the System folder
6) Search for the file RATINGS.POL and right click on it and choose Rename. Rename it to RATINGS.OLD
7) Close out of the open Windows and then reopen Internet Explorer
8) Click on Tools, Internet Options
9) Click on the Content tab, then click on Settings
10) Type in the Supervisor password if necessary and click Ok
11) Select the Ratings options you would like and click Ok and close out of Internet Explorer
12) When you reopen Internet Explorer, everything should work.

How to Remove the Content Advisor Passwordin Internet Explorer or Fix Missing Information


How to Remove Content Advisor Password in Internet Explorer

The following steps will remove any password set in the Internet Explorer Content Advisor and allow you to reset the program to its original state.
1) Click on Start and choose Run.
2) Type in RegEdit and select OK.
3) Now click on the little plus sign to the left of H_KEY_LOCAL_MACHINE.
4) Continue to drill down, always clicking on the plus sign at the left of the named key, through Software, Microsoft, Windows, Current Version and Policies.
5) Now click on the Ratings folder.
window.google_render_ad();
6) In the right pane of the RegEdit window, you'll see an icon called Key. Click on it and press Delete.
7) Next, choose Registry and then Exit to exit RegEdit. You've just deleted your original Content Advisor password.
8) Restart the computer and run Internet Explorer again.
9) Choose View and then Internet Options (or Options for version 3.x). For IE 5 or greater, Click on Tools, Internet Options.
10) Click on the Content tab and click on Disable. When asked for a password, don't enter anything; just click on OK. This will disable Content Advisor because there's no longer a password.


How to Fix Problems with Content Advisor Missing Information
In most cases, this problem occurs when the Ratings.pol file is damaged, follow the instructions below to fix this issue.
1) Quit Internet Explorer
2) Open My Computer, click on Tools, Folder Options
3) Click on the View tab and make sure "Show hidden files and folders" is selected, you may also want to uncheck the box next to "Hide extensions for known file types" and click Ok
4) Double click on Drive C in My Computer
5) Double click on the Windows folder and then double click on the System folder
6) Search for the file RATINGS.POL and right click on it and choose Rename. Rename it to RATINGS.OLD
7) Close out of the open Windows and then reopen Internet Explorer
8) Click on Tools, Internet Options
9) Click on the Content tab, then click on Settings
10) Type in the Supervisor password if necessary and click Ok
11) Select the Ratings options you would like and click Ok and close out of Internet Explorer
12) When you reopen Internet Explorer, everything should work.

Recover from a Corrupted Registry in Windows XP


When Will This Recovery Work?
You'll want to use the steps on this page to recover from a corrupted registry when you have already tried other options such as System Restore and you receive a message similar to one of the following when you try to boot your computer with Windows XP.
Windows XP could not start because the following file is missing or corrupt: \WINDOWS\SYSTEM32\CONFIG\SYSTEM
Windows XP could not start because the following file is missing or corrupt: \WINDOWS\SYSTEM32\CONFIG\SOFTWARE
Stop: c0000218 {Registry File Failure} The registry cannot load the hive (file): \SystemRoot\System32\Config\SOFTWARE or its log or alternate
System error: Lsass.exeWhen trying to update a password the return status indicates that the value provided as the current password is not correct.Be careful using this procedure in other circumstances or with an OEM version
of Windows XP since OEM installations create passwords and user accounts that did not exist previously and may cause you not to be able to log into the Recovery Console to restore files.

Booting into the Recovery Console
You'll need to use the Windows XP Recovery Console to fix a corrupted registry, this will either require you to boot from a Windows XP Installation CD or boot directly to the Recovery Console if its installed. Follow these steps to boot into the Recovery Console from a Windows XP Installation CD.1) Place your Windows XP in the CD-ROM Drive2) Restart your computer and make sure your BIOS is set to boot from CD3) When you see the following command press the space bar."press any key to boot from cd..."4) Wait until you see the "Welcome to Setup" screen, and press R to start the Recovery Console5) Choose which Windows installation you wish to load (this is usually #1 unless you have a multi-boot system)6) Type the administrator password and Press Enter7) You should now be at the C:\Windows> prompt

Copy Repair Files Using the Recovery Console
This procedure assumes Windows is installed on Drive C, if you have installed Windows on another drive, please substitute the appropriate drive letter in the procedure below.At the Recovery Console command prompt, type the following lines, pressing ENTER after you type each line:md tmpcopy c:\windows\system32\config\system c:\windows\tmp\system.bakcopy c:\windows\system32\config\software c:\windows\tmp\software.bakcopy c:\windows\system32\config\sam c:\windows\tmp\sam.bakcopy c:\windows\system32\config\security c:\windows\tmp\security.bakcopy c:\windows\system32\config\default c:\windows\tmp\default.bakdelete c:\windows\system32\config\systemdelete c:\windows\system32\config\softwaredelete c:\windows\system32\config\samdelete c:\windows\system32\config\securitydelete c:\windows\system32\config\defaultcopy c:\windows\repair\system c:\windows\system32\config\systemcopy c:\windows\repair\software c:\windows\system32\config\softwarecopy c:\windows\repair\sam c:\windows\system32\config\samcopy c:\windows\repair\security c:\windows\system32\config\securitycopy c:\windows\repair\default c:\windows\system32\config\default Type exit to quit Recovery Console. Your computer will restart, press F8 as it starts and choose Safe Mode.

Restart in Safe Mode and Find a Recent Snapshot Backup
Restart your computer in Safe Mode by pressing F8 during the initial bootup and choosing Safe Mode. Once in Safe Mode, you need to make sure the files and folders are visible so you can access them. Follow these instructions to accomplish this.1. Open My Computer2. Click on the Tools menu, then click Folder Options. 3. Click the View tab. 4. Under Hidden files and folders, click to select Show hidden files and folders, and then click to clear the Hide protected operating system files (Recommended) check box. 5. Click Yes when the dialog box that confirms that you want to display these files appears. In My Computer, Double-click the drive where you installed Windows XP (usually Drive C) to display a list of the folders. then double-click on the "System Volume Information" folder. This folder contains the system restore points stored on your computer. The folders will look similar to _restore{EE42BEB8-700A-495F-8004-53D26C2E12C5}You might receive an access denied error message similar to the following when trying to access the System Volume Information folder.C:\System Volume Information is not accessible. Access is denied. This is generally caused because the user you are logged in under does not have permissions set on the folder. To fix this, follow the instructions in the Microsoft Knowledge Base article 309531 to gain access and continue. Each version of Windows XP is different on how to change these permissions.Once you have access to the snapshots, use the instructions below to copy one of the latest snapshots to the Windows\TMP directory so you have access to it. 1) In the System Volume Information Folder, click on View, and then click Details to display the date of each snapshot folder.2) Double-click on a folder that was not created at the current time but rather before the problem started.3) Double-click on the Snapshot subfolder 4) Using your normal windows copy and paste techniques, highlight the following files and copy them into the C:\Windows\TMP folder
_REGISTRY_USER_.DEFAULT
_REGISTRY_MACHINE_SECURITY
_REGISTRY_MACHINE_SOFTWARE
_REGISTRY_MACHINE_SYSTEM
_REGISTRY_MACHINE_SAM 5) Rename the files that you just copied into the C:\Windows\TMP folder by right-clicking on each filename and choosing Rename, then typing the new name. Repeat this for each file in the list below.
Rename _REGISTRY_USER_.DEFAULT to DEFAULT
Rename _REGISTRY_MACHINE_SECURITY to SECURITY
Rename _REGISTRY_MACHINE_SOFTWARE to SOFTWARE
Rename _REGISTRY_MACHINE_SYSTEM to SYSTEM
Rename _REGISTRY_MACHINE_SAM to SAM 6) Once you have renamed the files, restart your computer again with the Recovery Console (refer to the instructions above to do this)

Replace the Repair Files with a Current Backup of the Registry
After rebooting the computer and starting the Recovery Console again, type the following commands at the prompt to replace the files with a current backup. You'll need to press Enter after each command.del c:\windows\system32\config\sam del c:\windows\system32\config\security del c:\windows\system32\config\software del c:\windows\system32\config\default del c:\windows\system32\config\system copy c:\windows\tmp\software c:\windows\system32\config\software copy c:\windows\tmp\system c:\windows\system32\config\system copy c:\windows\tmp\sam c:\windows\system32\config\sam copy c:\windows\tmp\security c:\windows\system32\config\security copy c:\windows\tmp\default c:\windows\system32\config\default After the files have been replaced, type EXIT at the command prompt to restart Windows in normal mode.

Use System Restore to Return to a Good Backup Point
Because there is more to a System Restore than just the registry files, follow these steps to restore your computer to a good backup point.1. Click Start, and then click All Programs. 2. Click Accessories, and then click System Tools. 3. Click System Restore, and then click Restore to a previous Restore Point and finish the restore.

Error: Strong name validation failed for assembly


Problem with Media Centre 2002 after downloading Windows XP Service Pack 3. Error message pops up when you try to open media center.
"EHShell.exe - Strong name validation failed." "Strong name validation failed for assembly C:\windows\ehome\EHShell.exe"The file may have been tampered with or it was partially signed but not fully signed with the correct private key. OK. After pressing on OK another box comes up with "EHShell.exe Common Language Runtime Debugging Services."Application has generated an exception that could not be handled Click OK to terminate application Click Cancel to debug
And when you click cancel to debug it , another message appears saying "EHShell.exe - No debugger found" "Registered JIT debugger is not available. An attempt to launch with the following command resulted in an error code of 0x2(2) " "Please check computer settings." "Cordbg.exe !a0x62c"

RESOLUTION
Microsoft has been aware of a conflict between SP3 and Media Center. The solution it offers is here: http://download.microsoft.com/download/c/d/8/cd8cc719-7d5a-40d3-a802-e4057aa8c631/relnotes.htm
where MS says: "This issue affects Windows XP Media Center Edition 2002. If you install Windows XP SP3 on a computer running Windows XP Media Center Edition 2002 with SP1, Windows XP Media Center Edition may malfunction. To avoid this, install Windows XP SP2 before you install Windows XP SP3. If this issue has already occurred, uninstall Windows XP SP3, install Windows XP SP2, and then reinstall Windows XP SP3."


Unable to Use or Install Microsoft Office 2007 (Cannot find Missing Product Key)


You may see the following message when you attempt to use any of the Microsoft Office products:
The Microsoft Office Activation Assistant was unable to detect a 2007 Microsoft Office release.


NOTE:
The product key for Microsoft Office 2007 trial software is not included in the product packaging. Do not use the 25-digit product key from the label attached to the outside of the computer case – this is a Windows product key and will not work with Office 2007. You must follow the instructions below to activate the Office 2007 trial.
Before a preinstalled office applications can be opened and used, acquire an online key from Microsoft to activate the 60 day trial. To do this, use the following steps:

NOTE:
If you are trying to install a full upgrade version of Office, it may be necessary to uninstall previous trial versions and then re-download and activate a qualifying trial version before the full version can be installed.
Connect to the Internet.
Double-click the icon for Microsoft Office 60 Day Trial on the windows Vista desktop.

Figure 1: Desktop icon

In the window that opens, click Click Here To Request Your Trial Activation Key Online .

Figure 2: Link to request an activation key


A product key appears in the field next to "

Figure 3: Field where the key appears


Select the activation key by clicking and dragging the mouse pointer over the key until the entire key text is selected.
With the enter key selected, press the CTRL + C keys. This copies the activation key to the Windows clipboard (a temporary holding place for data).
Write the activation key text down on paper.
Click the link Now Click Here To Launch Microsoft Office and Enter Your Trial Key .
An Enter your Product Key window opens.
Figure 4: Enter your Product Key window

Click anywhere inside the text field and press the CTRL + V keys. This should paste the activation key into the field. If not, enter the activation key text that was written down on paper.
Click Continue to go through an activation and configuration process. Read and respond to the screens that open. When this process is complete, Microsoft Office is ready to use for the trial period.

NOTE:
When the trial period has expired, Microsoft Office must be purchased to continue use. You can convert the trial version to a full version by clicking Convert in the reminder messages when they appear or by selecting Activate your software from the Help menu at any time.

Hot fix for sleep mode issue: Vista


First Try the steps in the below document.
http://h10025.www1.hp.com/ewfrf/wc/document?docname=c00845808&cc=us&dlc=en&lc=en&jumpid=reg_R1002_USEN

Microsoft has released a hot fix. You can download & install this. I have observed that this patch has resolved the issue most of the times.

http://www.microsoft.com/downloads/details.aspx?familyid=A23E4401-74B7-4987-96AB-86735F718A8E&displaylang=en

How to troubleshoot wireless network connections in Windows XP Service Pack 2


http://support.microsoft.com/kb/870702

Solved: HP Total Care Advisors Tips and Tricks to Fix Solution


Hp Total Care Advisor Fix Repair Solution Vista Problems Errors Failures NEW INSTRUCTIONS FOR FIX UPDATED AS OF 11/25/2007READ THIS FOR A FIX TO HP TOTAL CARE ADVISOR WINDOWS VISTA First: Go to system restore and click on the advance tab and at the bottom of the screen click on create system restore point, Name the point "____"and then you may begin when the point is finished being created.

* STEP ONE: UNINSTALL HP TOTAL CARE ADVISOR

* STEP TWO:

(Desktop Version) GOTO http://www.mediafire.com/download.php?cvzbc0zozwq
and
(Laptop version) GOTO http://www.mediafire.com/download.php?1wmljrjwfuz
DOWNLOAD AND SAVE FILE hp_total_care_advisor.rar (11.41MB) TO DESKTOP »

* STEP THREE: GOTO http://h30155.www3.hp.com/helpandsupport/DOWNLOAD sp36082.exe(5.61 MB) FILE AND SAVE TO DESKTOPTHEN RUN FILE » sp36082.exe(5.61 MB)SELECT YES TO OVERWRITE ALL FILES (THIS IS THE LIBRARY FILES NOT THE PROGRAM FILES)

*STEP FOUR: GOTO http://www.filehippo.comin the searchbar @ filehippo.com [type] winrardownload and save WinRAR 3.70RARLab - 1.15MB (Shareware) to desktop

* Step Five:go to explore and Program Files folder, and open folder Hewlet-Packard, and delete the subfolder HP ADVISOR

* Step Six: run WinRAR 3.70 RARLab - 1.15MB (Shareware) and extract the rar file hp_total_care_advisor.rar you saved on your desktop

* Step Seven: your HP TOTAL CARE ADVISOR should be installed and have created a new subfolder HP Advisor in the HEWLETT-PACKARD Program Files folder, If the system promts you to create the folder or browse to install in that location file.

* Step Eight: Go to the application HP Advisor file in the newly created HP Advisor Subfolder create a shortcut to desktop for the application and then run the application.Everything should be fine from there on out and it is your option to place the application to run on startup or not in your msconfig settings, I choose not so that I have the additional RAM available to run the system faster and the application as needed instead of on startup.

* Step Nine: After everything is running as it should and all your setting are as you need them and would like them, Then run System restore again and choose the advanced tab and select to Create a new Restore point and Name it After InstalL Setup of "_______" previous named point afterward and again to secure your system integrity as you did in the begining.

For Reference : http://forums.techguy.org/tech-tips-tricks/605706-solved-hp-total-care-advisors.html#post5387131

Solution : Error message when you run Windows Defender: "Error Code 0x800106ba"

SYMPTOMS
When you run Microsoft Windows Defender, you receive one of the following error...
loadTOCNode(1, 'symptoms');

When you run Microsoft Windows Defender, you receive one of the following error messages:
Error Code 0x800106ba Application failed to initialize
Error Code 0x800106ba The systems license has expired. Your logon request is denied.

CAUSE
This problem may occur when Windows Defender is updated.
loadTOCNode(1, 'cause');

This problem may occur when Windows Defender is updated.

RESOLUTION
To resolve this problem, follow these steps: Uninstall Windows Defender, and the...
loadTOCNode(1, 'resolution');

To resolve this problem, follow these steps:
Uninstall Windows Defender, and then reinstall Windows Defender. To do this, follow these steps:
Click Start, click Run, type appwiz.cpl, and then click OK.
Click Windows Defender, and then click Remove.
Follow the prompts to uninstall Windows Defender.
To reinstall Windows Defender, visit the following Microsoft Web site:
http://www.microsoft.com/athome/security/spyware/software (http://www.microsoft.com/athome/security/spyware/software)
If this issue is not resolved after you complete step 1, uninstall Windows Defender, use the Windows Installer CleanUp utility, and then reinstall Windows Defender. To do this, follow these steps:
Click Start, click Run, type appwiz.cpl, and then click OK.
Click Windows Defender, and then click Remove.
Follow the prompts to uninstall Windows Defender.
To use the Windows Installer CleanUp utility, click the following article number to view the article in the Microsoft Knowledge Base:
290301 (http://support.microsoft.com/kb/290301/ ) Description of the Windows Installer CleanUp utility
To reinstall Windows Defender, visit the following Microsoft Web site:
http://www.microsoft.com/athome/security/spyware/software (http://www.microsoft.com/athome/security/spyware/software)
If this issue is not resolved after you complete step 2, follow this step:
Click Start, click Run, type regsvr32 file name, and then click OK.Note In this step, file name is a placeholder for the following files.Repeat this procedure for the following files:
wuapi.dll
wuaueng.dll
wucltui.dll
wups.dll
wuweb.dll
atl.dll
softpub.dll
wintrust.dll
initpki.dll
mssip32.dll


APPLIES TO
Windows Defender

Clear IE7 Browsing History From the Command Line


If you like to build batch files to automate cleanup on your computer, you'll probably want to include at least one of these commands in your batch script. You can automate any one of the functions on the Internet Explorer 7 Delete Browsing History dialog.

Here's the dialog that you are probably used to seeing:


And here's the commands that correspond to the different buttons. The most important one from a cleanup perspective is the first, which will delete just the temporary internet files that are cluttering up your computer.

To use these commands, just run them from the command line, the start menu search box in vista, or a batch file.

Temporary Internet Files :
RunDll32.exe InetCpl.cpl,ClearMyTracksByProcess 8

Cookies :
RunDll32.exe InetCpl.cpl,ClearMyTracksByProcess 2

History :
RunDll32.exe InetCpl.cpl,ClearMyTracksByProcess 1

Form Data:
RunDll32.exe InetCpl.cpl,ClearMyTracksByProcess 16

Passwords :
RunDll32.exe InetCpl.cpl,ClearMyTracksByProcess 32

Delete All :
RunDll32.exe InetCpl.cpl,ClearMyTracksByProcess 255

Delete All - "Also delete files and settings stored by add-ons" :
RunDll32.exe InetCpl.cpl,ClearMyTracksByProcess 4351

These commands should work in Internet Explorer 7 on XP or on Windows Vista.


iPod shows up in Windows but not in iTunes


There are several possible solutions to an issue where you may see your iPod in My Computer, but not in the iTunes Source pane. Start at the top and work your way through the steps until your iPod works with your computer.
Install the latest version of iTunes
http://www.apple.com/itunes/download

Restart the iPod Service (Click to hide)

1: Quit iTunes.
2: Right click on My Computer/Computer and click Manage. If Windows requires your permission to continue, click Continue.
3: Click the plus symbol to the left of Services and Applications.
4: Select Services listed under Services and Applications.

5: Double click iPod Service in the right hand panel.
6: Click the Stop button under the General tab and leave the iPod Service Properties window open.
7: Connect your iPod and wait until it is visible in My Computer/Computer.
8: Click the Start button in the iPod Service Properties window.
9: Open iTunes.

Remove iTunes

Note: Songs you purchased from the iTunes Store or imported from CDs are saved in your My Music/Music folder by default and are not deleted by removing iTunes

1: Quit iTunes.
2: On the Start menu, click Control Panel.
3: Windows XP and Windows 2000: In Control Panel, open Add or Remove Programs.
Windows Vista: In Control Panel, click Uninstall a program. Alternately, in Classic View of Control Panel, click Programs and Features.
4: Select iTunes from the list of currently installed programs, then click Remove or Uninstall.
5: In Windows XP and Windows 2000, when asked if you would like to remove iTunes, select Yes.


6: In Windows Vista, if your permission is needed to continue, click Continue.
7: After uninstalling iTunes, do not restart if you are prompted to.
8: In Add or Remove Programs or Programs and Features, remove any iPod Updater applications that are listed in the same fashion as iTunes was removed.
9: Restart your computer.
10: After the computer restarts, open Local Disk C: in My Computer/Computer or whichever disk programs are installed on.
11: Open the Program Files folder.
12: Right-click the iTunes folder and select Delete and choose Yes when asked to confirm the deletion. Note: This folder may have already been deleted if iTunes was successfully removed in steps 1-8.
13: Right click the iPod folder and select Delete and choose Yes when asked to confirm the deletion.
14: Right-click on the Recycle Bin and on the shortcut menu, click Empty Recycle Bin.
15: Restart your computer.
16: Install the latest version of iTunes from http://www.apple.com/itunes/download and connect your iPod.

Empty your Temp directory and restart


1: On the Start menu, click My Computer (or double-click My Computer on the Desktop).
2: In My Computer, open Local Disk C:.
3: Open Documents and Settings.
4: Double-click the folder that bears your username.
5: If you see a Local Settings folder, skip to step 9. If you don't see a Local Settings folder, proceed to the next step.
6: On the Tools menu, click Folder Options.
7: Select the "Show hidden files and folders" button.

8: Click OK.
9: Double-click Local Settings.
10: Right-click on the Temp folder and on the shortcut menu, click Delete.
11: In the confirmation dialog that appears, click Yes.
12: If you are unable to delete the Temp folder, close all programs, especially those in the Notification area (system tray) of the Windows Task bar shown below and repeat step 10.

13. Restart your computer.
14. Install the latest version of iTunes from http://www.apple.com/itunes/download and connect your iPod.

Clean up iTunes installer files on the computer


You can download the Windows Installer Cleanup Utility from Microsoft, which will clean up any leftover installer files that may be causing issues with your current installation. To do this:

1: Click here first, and read the important information about the software.
2: Click the "Download the Windows Installer Cleanup Utility package now" link on that page to download a file titled msicuu2.exe.
3: Open the msicuu2.exe file and follow the prompts to install it.
4: On the Start menu, point to All Programs and then click Windows Install Cleanup; the Windows Installer Clean Up Utility window appears, listing software that is currently installed on your computer.
5: Select iTunes from the list and click Remove.
6: Click OK in the confirmation dialog that appears.
7: Repeat steps 5 and 6 if you have multiple iTunes entries listed.
8: Select QuickTime from the list and click Remove.
9: Click OK in the confirmation dialog that appears.
10: Repeat steps 8 and 9 if you have multiple QuickTime entries listed.
11: Click Exit.
12: Restart the computer.
13: Install the latest version of iTunes from http://www.apple.com/itunes/download and connect your iPod.


iPod shows up in Windows but not in iTunes


There are several possible solutions to an issue where you may see your iPod in My Computer, but not in the iTunes Source pane. Start at the top and work your way through the steps until your iPod works with your computer.
Install the latest version of iTunes
http://www.apple.com/itunes/download

Restart the iPod Service (Click to hide)

Quit iTunes.
Right click on My Computer/Computer and click Manage. If Windows requires your permission to continue, click Continue.
Click the plus symbol to the left of Services and Applications.
Select Services listed under Services and Applications.
1. Double click iPod Service in the right hand panel.
2. Click the Stop button under the General tab and leave the iPod Service Properties window open.
3. Connect your iPod and wait until it is visible in My Computer/Computer.
4. Click the Start button in the iPod Service Properties window.
5. Open iTunes.

Access denied error on HP My Display


Most of the monitor going to sleep issue are being resolved by BIOS update so kindly
check in HP.com for BIOS updates for the respective motherboards.

1. Vista Users - If you encounter a failure when updating your monitor driver you will need to run the MyDisplay Patch. The failure will present itself as an "Access Denied" error message or "An error has occurred when trying to update the display drivers".


Issue:System is unable to remove the monitor drivers after installing your monitor software.
Description:Typically the error appears as an Access Denied message or when installing or uninstalling the monitor driver you are not presented with the option to delete the drivers.
This problem is exclusive to Windows Vista and should not occur on XP.
This utility fixes the issue by restoring the proper permissions to the required areas in Windows necessary to allow correct monitor driver installation.
Instructions:Download DRVFix.zip.
The fix contains 3 files including this readme. All must be in to the same folder.
readme.txt - This file
DRVFix.txt - Required Text File
DRVFix.exe - Run this file in Administrator mode after reading the instructions completely
To perform the fix do the following:
1:Extract all files in to a folder on your desktop
2:Open the folder, right click on the DRVFix.exe file and choose "Run As Administrator"
3:Follow the on screen instructions. When complete, you should be able to install your drivers

Should you encounter the problem again we recommend you check for updates of your monitor software. To do this open your monitor software from the icon in the system tray and choose Check For Updates. If any updates exist, installing them and re-running this utility should resolve the problem.

Enable Audio Over DVI and HDMI in Windows XP or Windows Vista

If you have a new graphics card such as the Radion HD 3450 your graphics card most likely has an audio controller onboard, this means you can output video and sound when your computer is connected to a TV with a HDMI port.

If you are using a DVI to HDMI adaptor you will need to use one that supports audio from the graphics card’s DVI connection as well as video.

If your graphics card doesn’t come with a DVI to HDMI adaptor that supports audio have a look on Ebay and search for “ATI DVI to HDMI” all the official ATI adaptors should be fine for this.

I can’t really provide a list of graphics cards that have an audio controller onboard but it should be listed on the graphics cards manufactures website if your particular card supports this or not.

Most cards in the Radion 2600, 3000 and 4000 series by Sapphire support this. In my media centre pc I’m using a Sapphire Radeon HD 3450


If you know you’re hooked up with the correct cables and adaptors lets begin!

Vista Users:

Click the Vista orb in the bottom left of the screen, then select control panel (select classic view in the top left if needed)

Now find sound and click on it

You should now see a list of playback devices, select Digital Output Device (HDMI) and right click on it. (depending on your graphics card and manufacturer the name could be slightly different)

On the right click menu select Set as Default Device.


That’s it, simple as that! The audio controller on your graphics card will be the default sound device.


You might have to select the volume control in to the system tray and ensure the volume is fully turned up.

Your sound will now be going through the HDMI cable to your TV or Receiver as well as the picture.If you ever want your sound to play though your computers sound card just set it as the default device again.

Reset Media player in Vista.


try this link http://support.microsoft.com/default.aspx/kb/925704/en-us

Steps to reset Mediaplayer in Vista.

1. Click Start - All Programs - Accessories
2. Right Click Command Prompt and select "Run as administrator"
3. Type the following command and press Enter.
regsvr32 wmp.dll
A Popup Regsvr32 will come up as the following: DLLRegisterServer in wmp.dll succeeded.
4. Launch the Windows Media Player. It should work fine.

Alternate Steps to reset the WMP in Vista.

Delete the following folder:
1. %USERPROFILE%\Local Settings\Application Data\Microsoft\Media Player
2. Locate and delete the following registry keys:
3. HKEY_CURRENT_USER\Software\Microsoft\MediaPlayer
4. HKLM\Software\Microsoft\MediaPlayer
5. Restart the computer.

Unable to open .PPS attachments directly from Windows Mail


Symptom:

When you open a .PPS file that came as a mail attachment in Windows Mail, you may see the Open / Cancel dialog box. When you select Open, the following error may be displayed:
This file does not have a program associated with it for performing this action. Create an association in the Set Associations control panel.
This may happen even though you have PowerPoint Viewer 2003 or 2007 installed. However, the same file may open correctly when saved to disk, and then viewed. Note that this problem does not occur if you have Microsoft Office or PowerPoint installed.

Cause :

This happens if the Open command is missing for .PPS and/or .PPT file types.
Resolution
To resolve the issue, follow these steps:
For .PPS files (Microsoft PowerPoint Slideshow)
• Click Start, type regedit.exe and press ENTER
• Navigate to the following branch:
HKEY_CLASSES_ROOT\PowerPointViewer.SlideShow.11\shell\Show
• Right-click Show and click Rename
• Type the word Open so that Show is replaced by Open command
• If you have PowerPoint Viewer 2007 installed, repeat the above steps in this key, as well:
HKEY_CLASSES_ROOT\PowerPointViewer.SlideShow.12\shell\Show
• After changing Show to Open, close Registry Editor window.
For .PPT files (Microsoft PowerPoint Presentation)
• Click Start, type regedit.exe and press ENTER
• Navigate to the following branch:
HKEY_CLASSES_ROOT\PowerPointViewer.Show.11\shell\Show
• Right-click Show and click Rename
• Type the word Open so that Show is replaced by Open command
• If you have PowerPoint Viewer 2007 installed, repeat the above steps in this key, as well:
HKEY_CLASSES_ROOT\PowerPointViewer.Show.12\shell\Show
• After changing Show to Open, close Registry Editor window.

Device manager is blank

Device manager is blank even when plug and play service was running.

The issue is security permissions in the registry. You must use regedt32.exe.

You must be logged on as a local administrator to perform this task:

1. Go to "Start", "Run", and enter "regedt32"
2. Maximize the "HKEY_LOCAL_MACHINE" window.
3. Scroll down to "SYSTEM\CurrentControlSet\Enum"
4. With "Enum" selected right-click on it and click on the "Security" in "Permissions" menu.

Note: At this point you will probably notice there are no permissions on this key.

5. Click "Add".
6. Add the group "Everyone" and the user "SYSTEM".
7. Select "Everyone" and check "Read" ONLY!
8. Select "SYSTEM" and check "Full Control".
9. Click the "Advanced" button at the bottom of the window.
10. On the Advanced window check "Replace permissions on all child objects..."
11. Click "OK"
12. On the warning window click "Yes"
13. Close REGEDT32

Error message while playing a BLUE RAY DISC


install the update.
http://drmlicense.one.microsoft.com/indivsite/en/indivit.asp

MS works 8 has stopped working


Here is a easy fix for "MS works 8 has stopped working " error

Download this patch
http://www.microsoft.com/downloads/details.aspx?FamilyID=65f5b806-e6a1-4f92-a656-e56eeda67e3d&DisplayLang=en

OR heres a workaround

start> control panel> printers

-right click on microsoft XPS document writer and select set as default printer


Note: When the default printer is set to Microsoft XPS Document Writer, it creates a XML Paper Specification (XPS) document that can be viewed or printed from any browser. The printing process creates this file.

- Locate the file just saved with the XPS extension and open the file.

-Internet Explorer will automatically launch and open the XPS file.

disabling narrator/magnifier from startup


How to disable narrator and/or magnifier frm startup

HKCU\Software\Microsoft\Windows NT\CurrentVersion\Accessibility

Clear the value(textbox) for Configuration